It’s been a long time since we posted. We’ve had a big long break as real life has reared its head, but we are back.
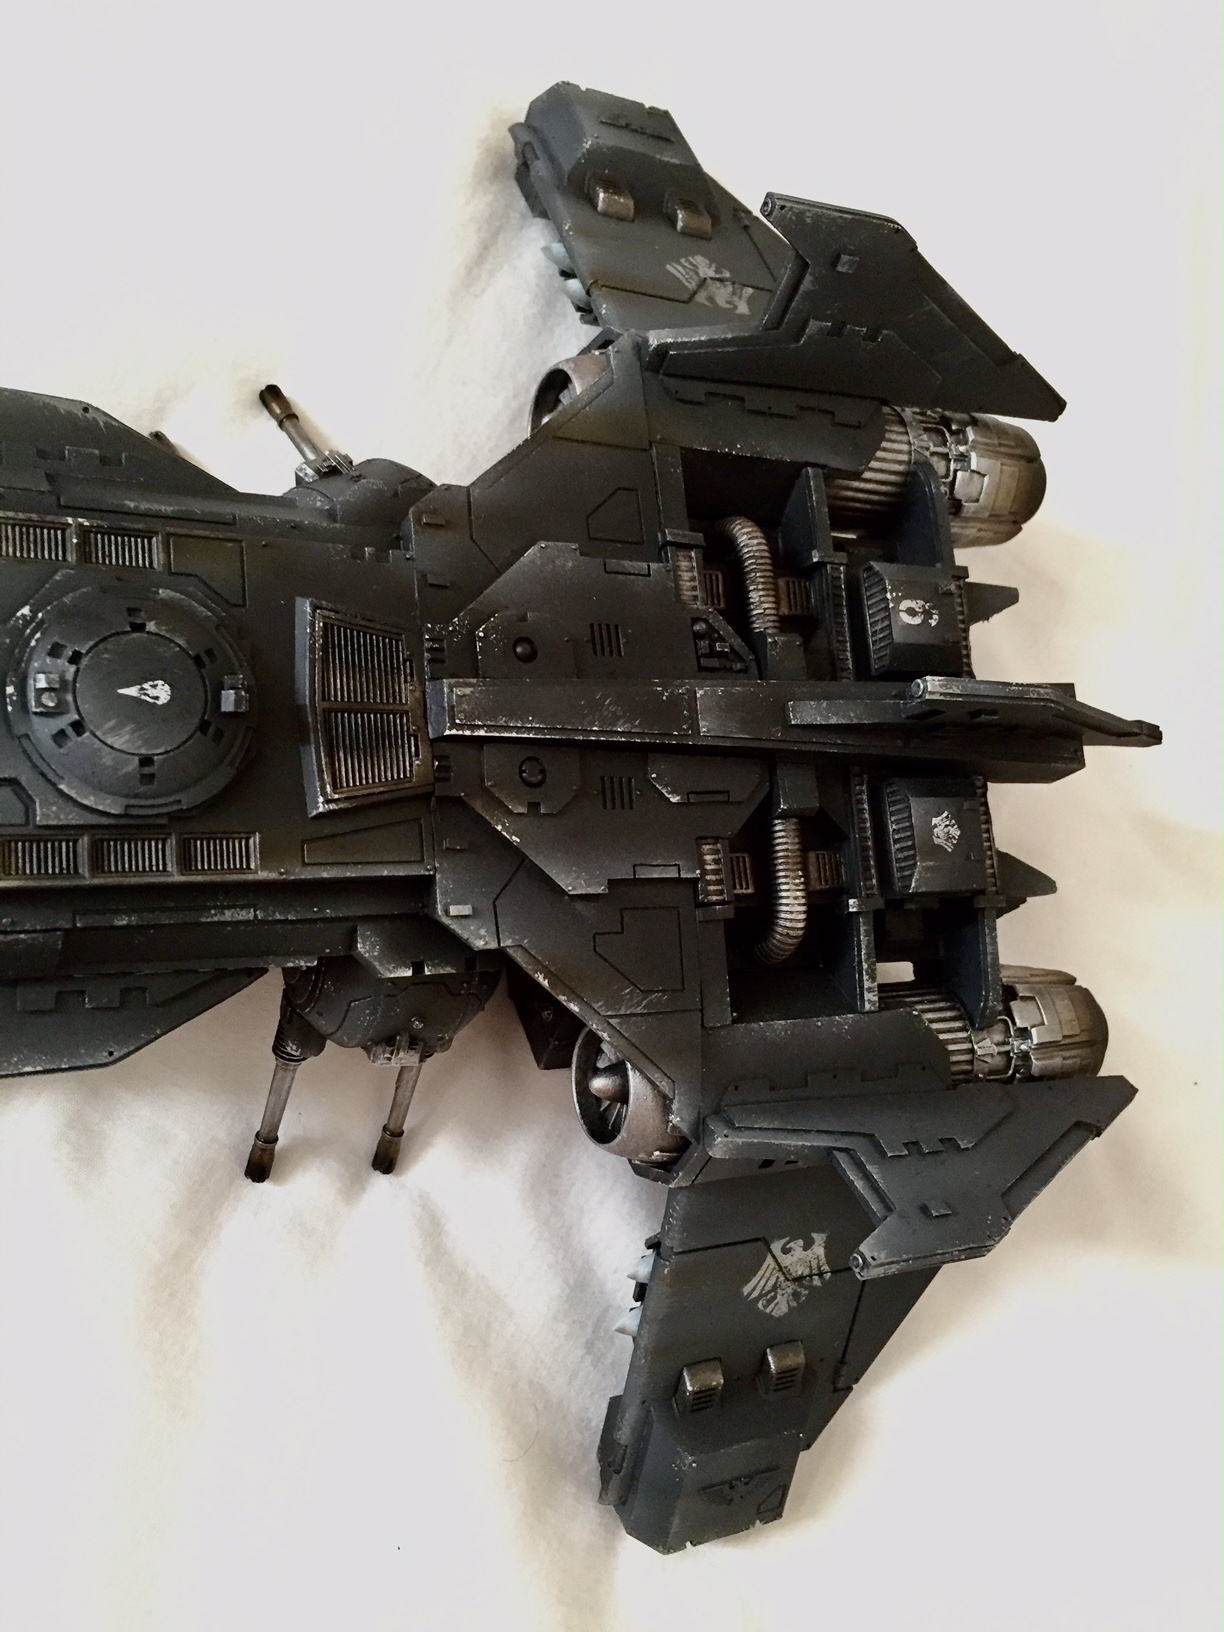
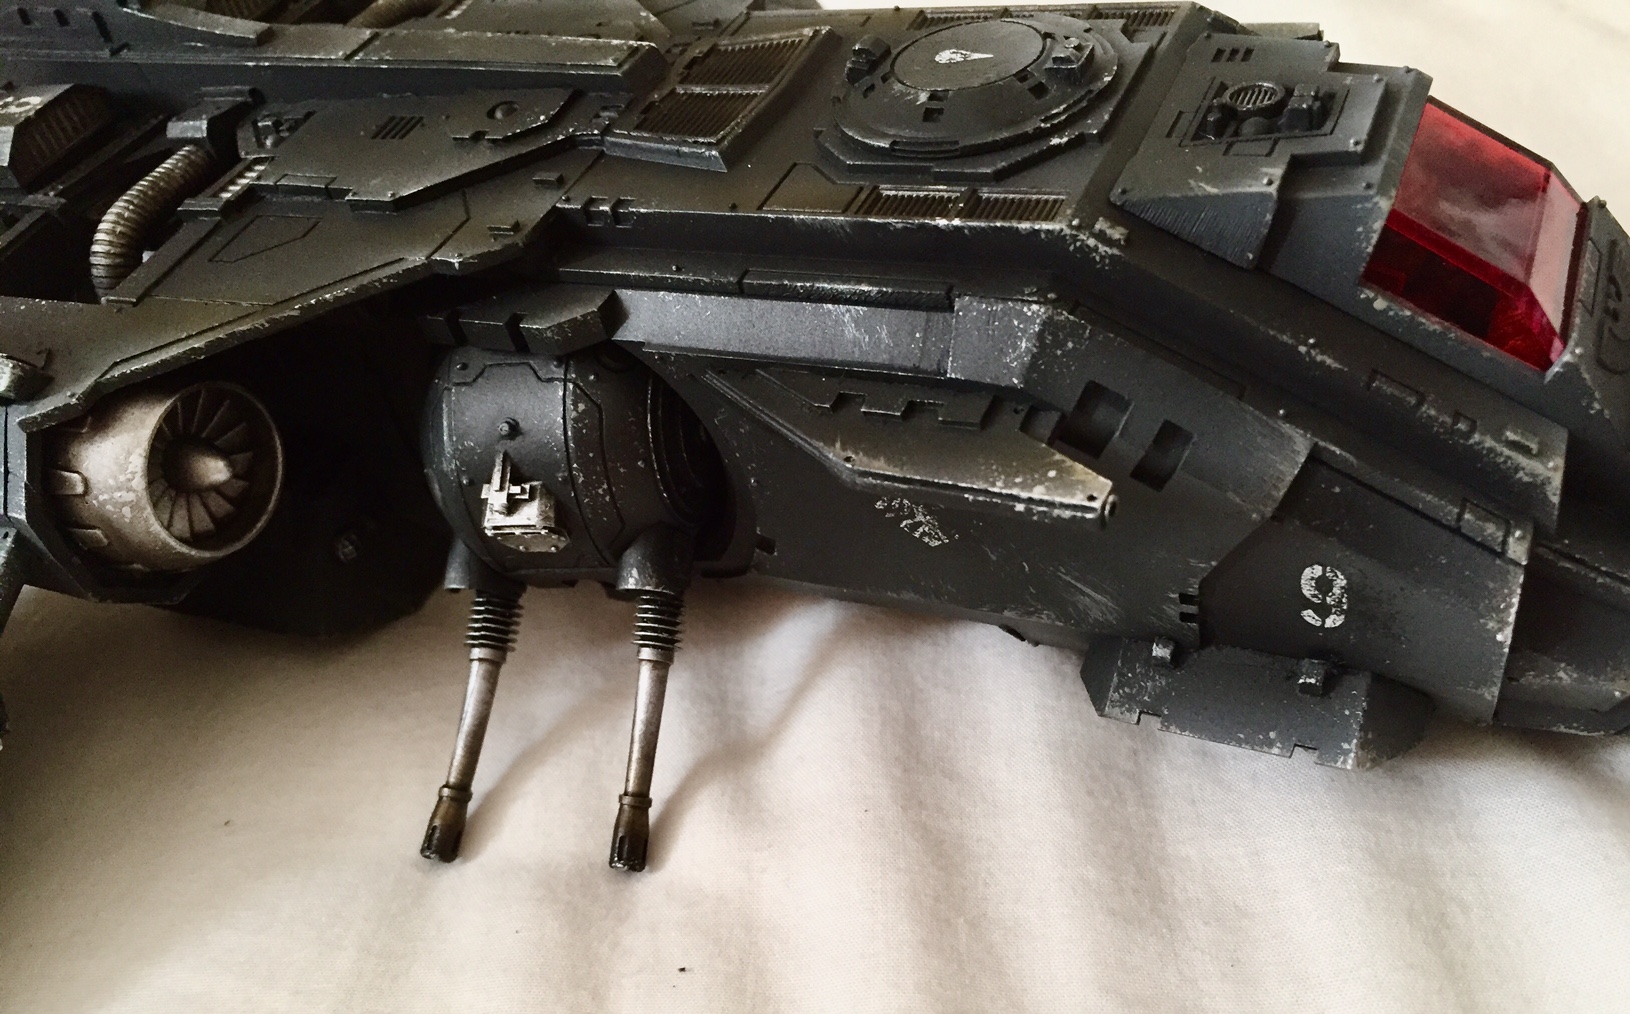
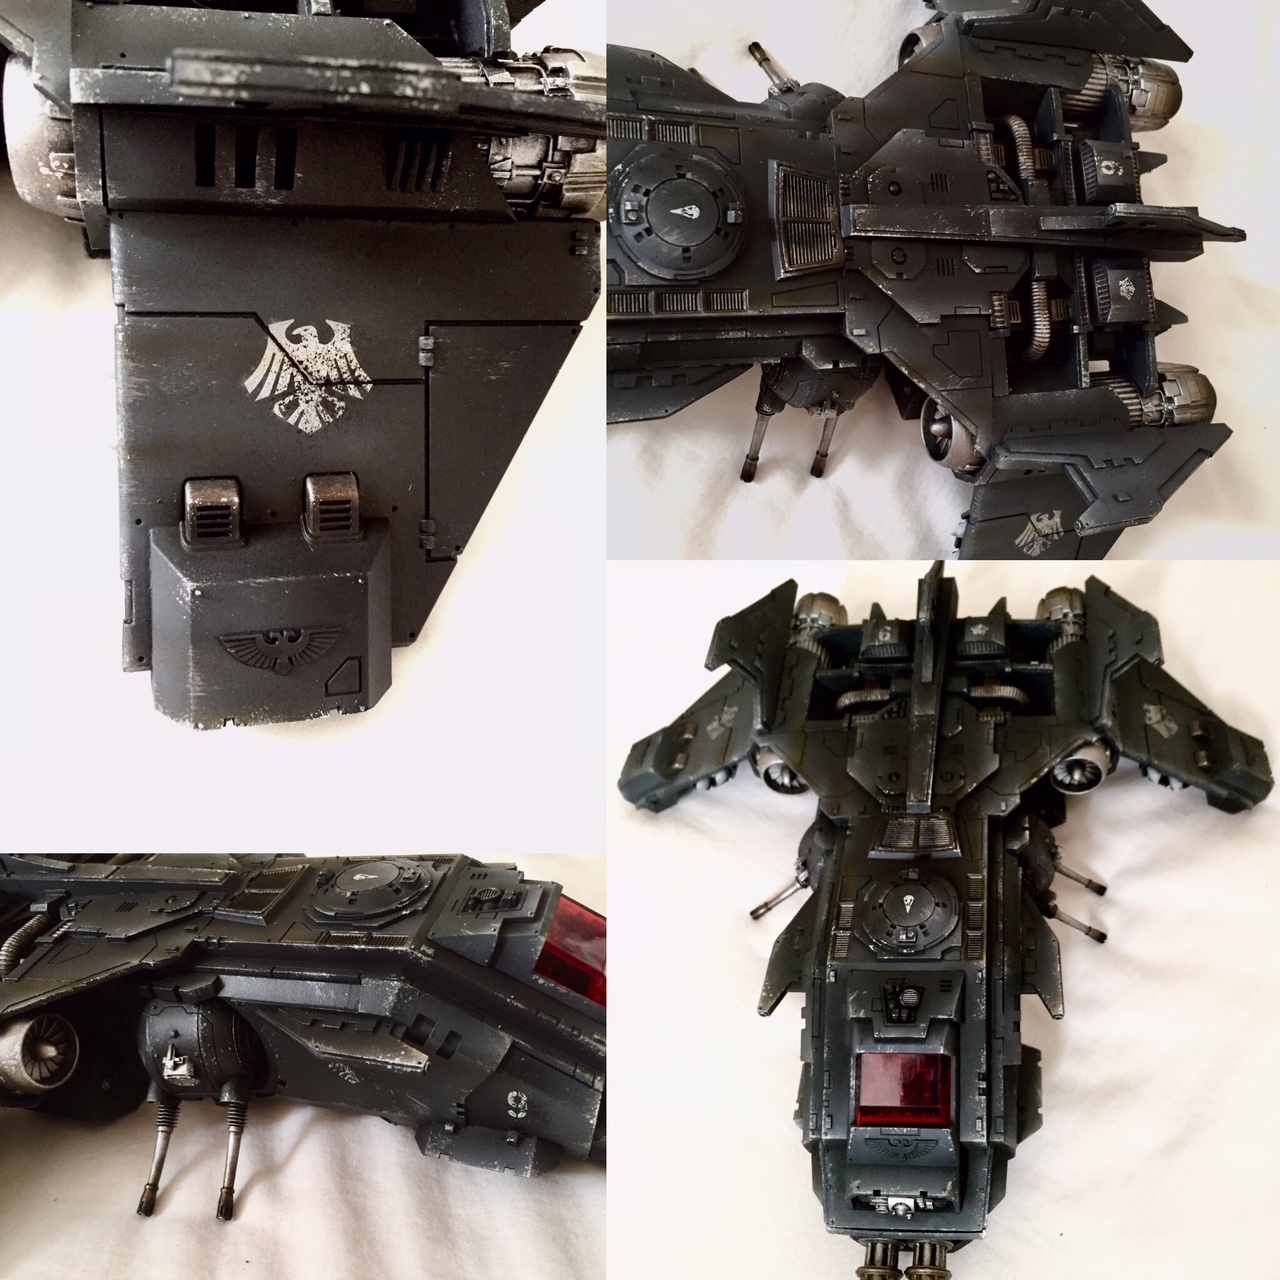
Here’s a post with some images of my newest air support 🙂
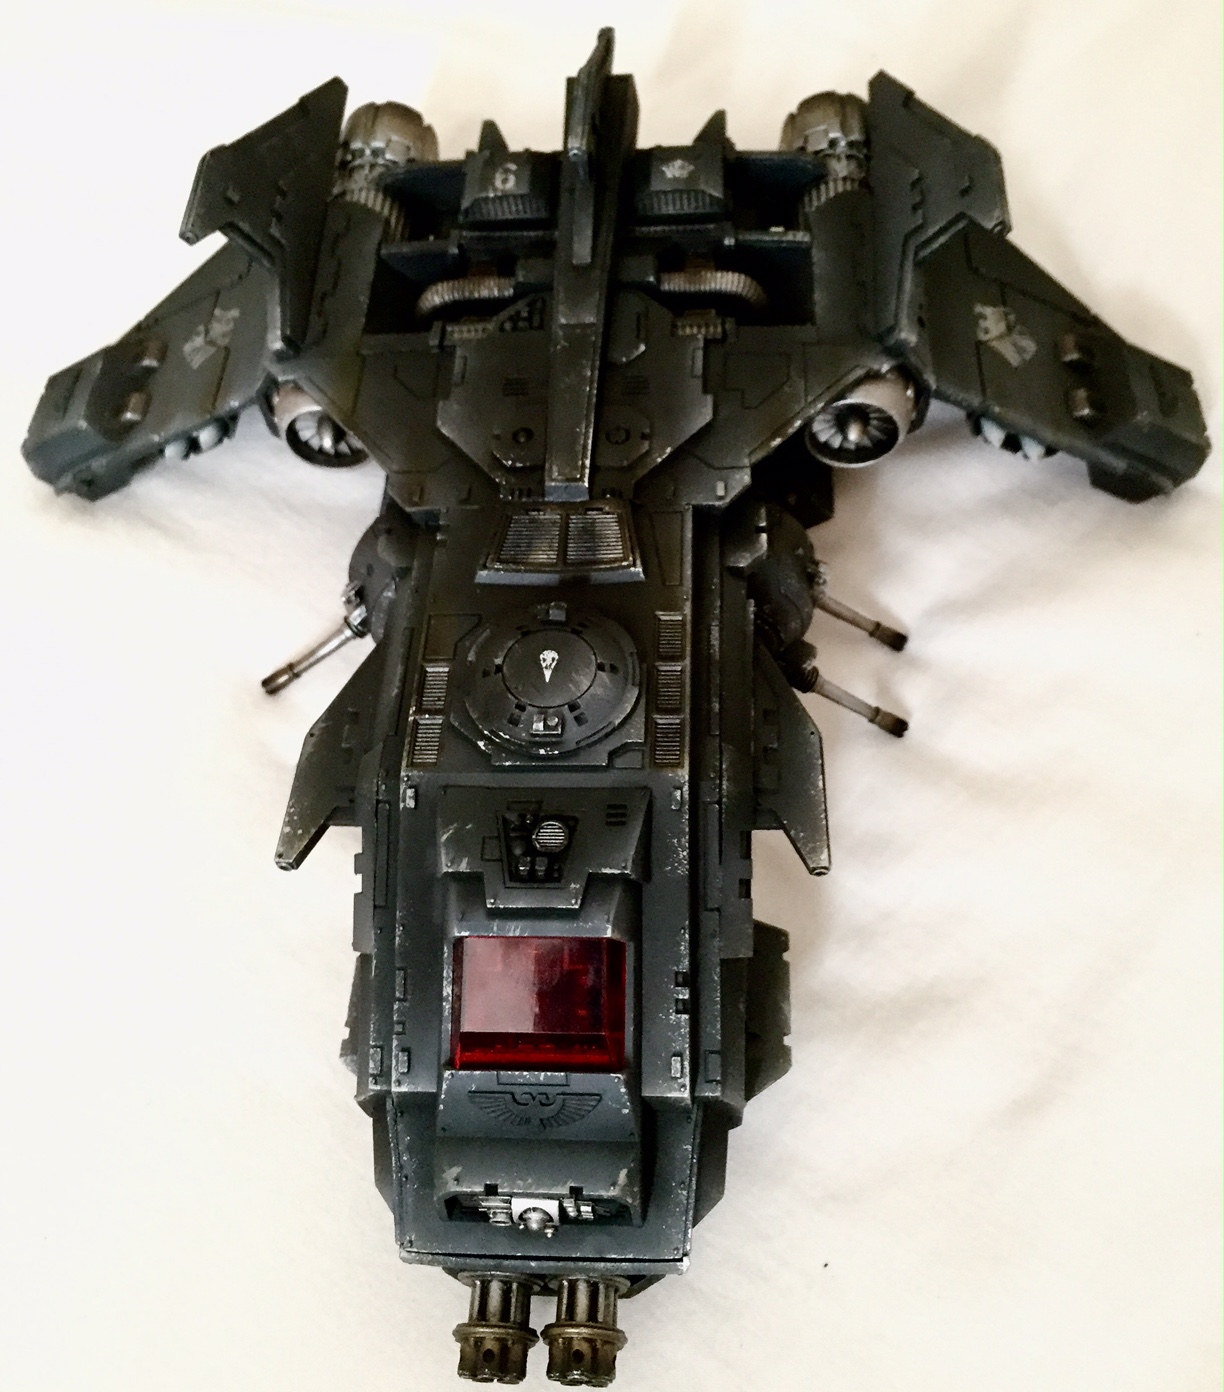
Fire Raptor

Cheers,
Neil

It’s been a long time since we posted. We’ve had a big long break as real life has reared its head, but we are back.
Here’s a post with some images of my newest air support 🙂
Fire Raptor
Cheers,
Neil
Hello internet!
So, I thought it would be worth sharing some information with all the fellow hobbyists out there. The information in question is around MKA Studios painting courses, which are held at Element Games in Stockport every 8 weeks or so.
MKA was founded by Mathew Kane (yes, that one! The one who painted all those stunning models for Forge World! Curze, Horus, Ferrus etc. – and no, I’m getting nothing from him for this plug!) and quickly added multiple Golden Demon and ‘Best in Show’ winner, Andy Wardle.
He painted this!

And this!

Courses take the format of a weekend of airbrush instruction, weathering tips and teaching of various other techniques and every student, *every* student has produced stunning results. I believe they’re on course number 5 or 6 now… and a student from course number 2, took his new skills and put them to use on a squadron of Heresy Death Guard tanks.. for which he one the squadron category at the last Golden Demon.

Put simply, this course will improve your skills whether you’re a novice airbrush user or a keen hobbyist with years of experience. It has also built a strong community of folks who’ve attended and regularly who share ideas and encourage each others’ efforts. I attended the first ever course and although I’ve been painting for years I never felt that I was getting the most from my airbrushing.
I painted this:


The next course is October 24th/25th, at Element Games in Stockport, UK, and I believe this one is based around painting infantry for previous attendees, but first timers are usually guided towards painting something ‘Rhino-sized’ to learn the basics.

If you’re interested – and why wouldn’t you be – then you can check out the ticket availability with Element on their website here.
Cheers,
Neil
++Begin Transmission++
Forging the Iron Hands Narrative
In this blog post I describe how I am going to create my 40k Iron Hands army along the lines of the 40k universe (or fluff). I intend to make this the first post of two.
This post will cover the chapter and squads, while the second will list known and living characters.
In later joint posts I will also cover my 30k Iron Hands Legion, units and characters.
Guilliman’s Codex Astartes
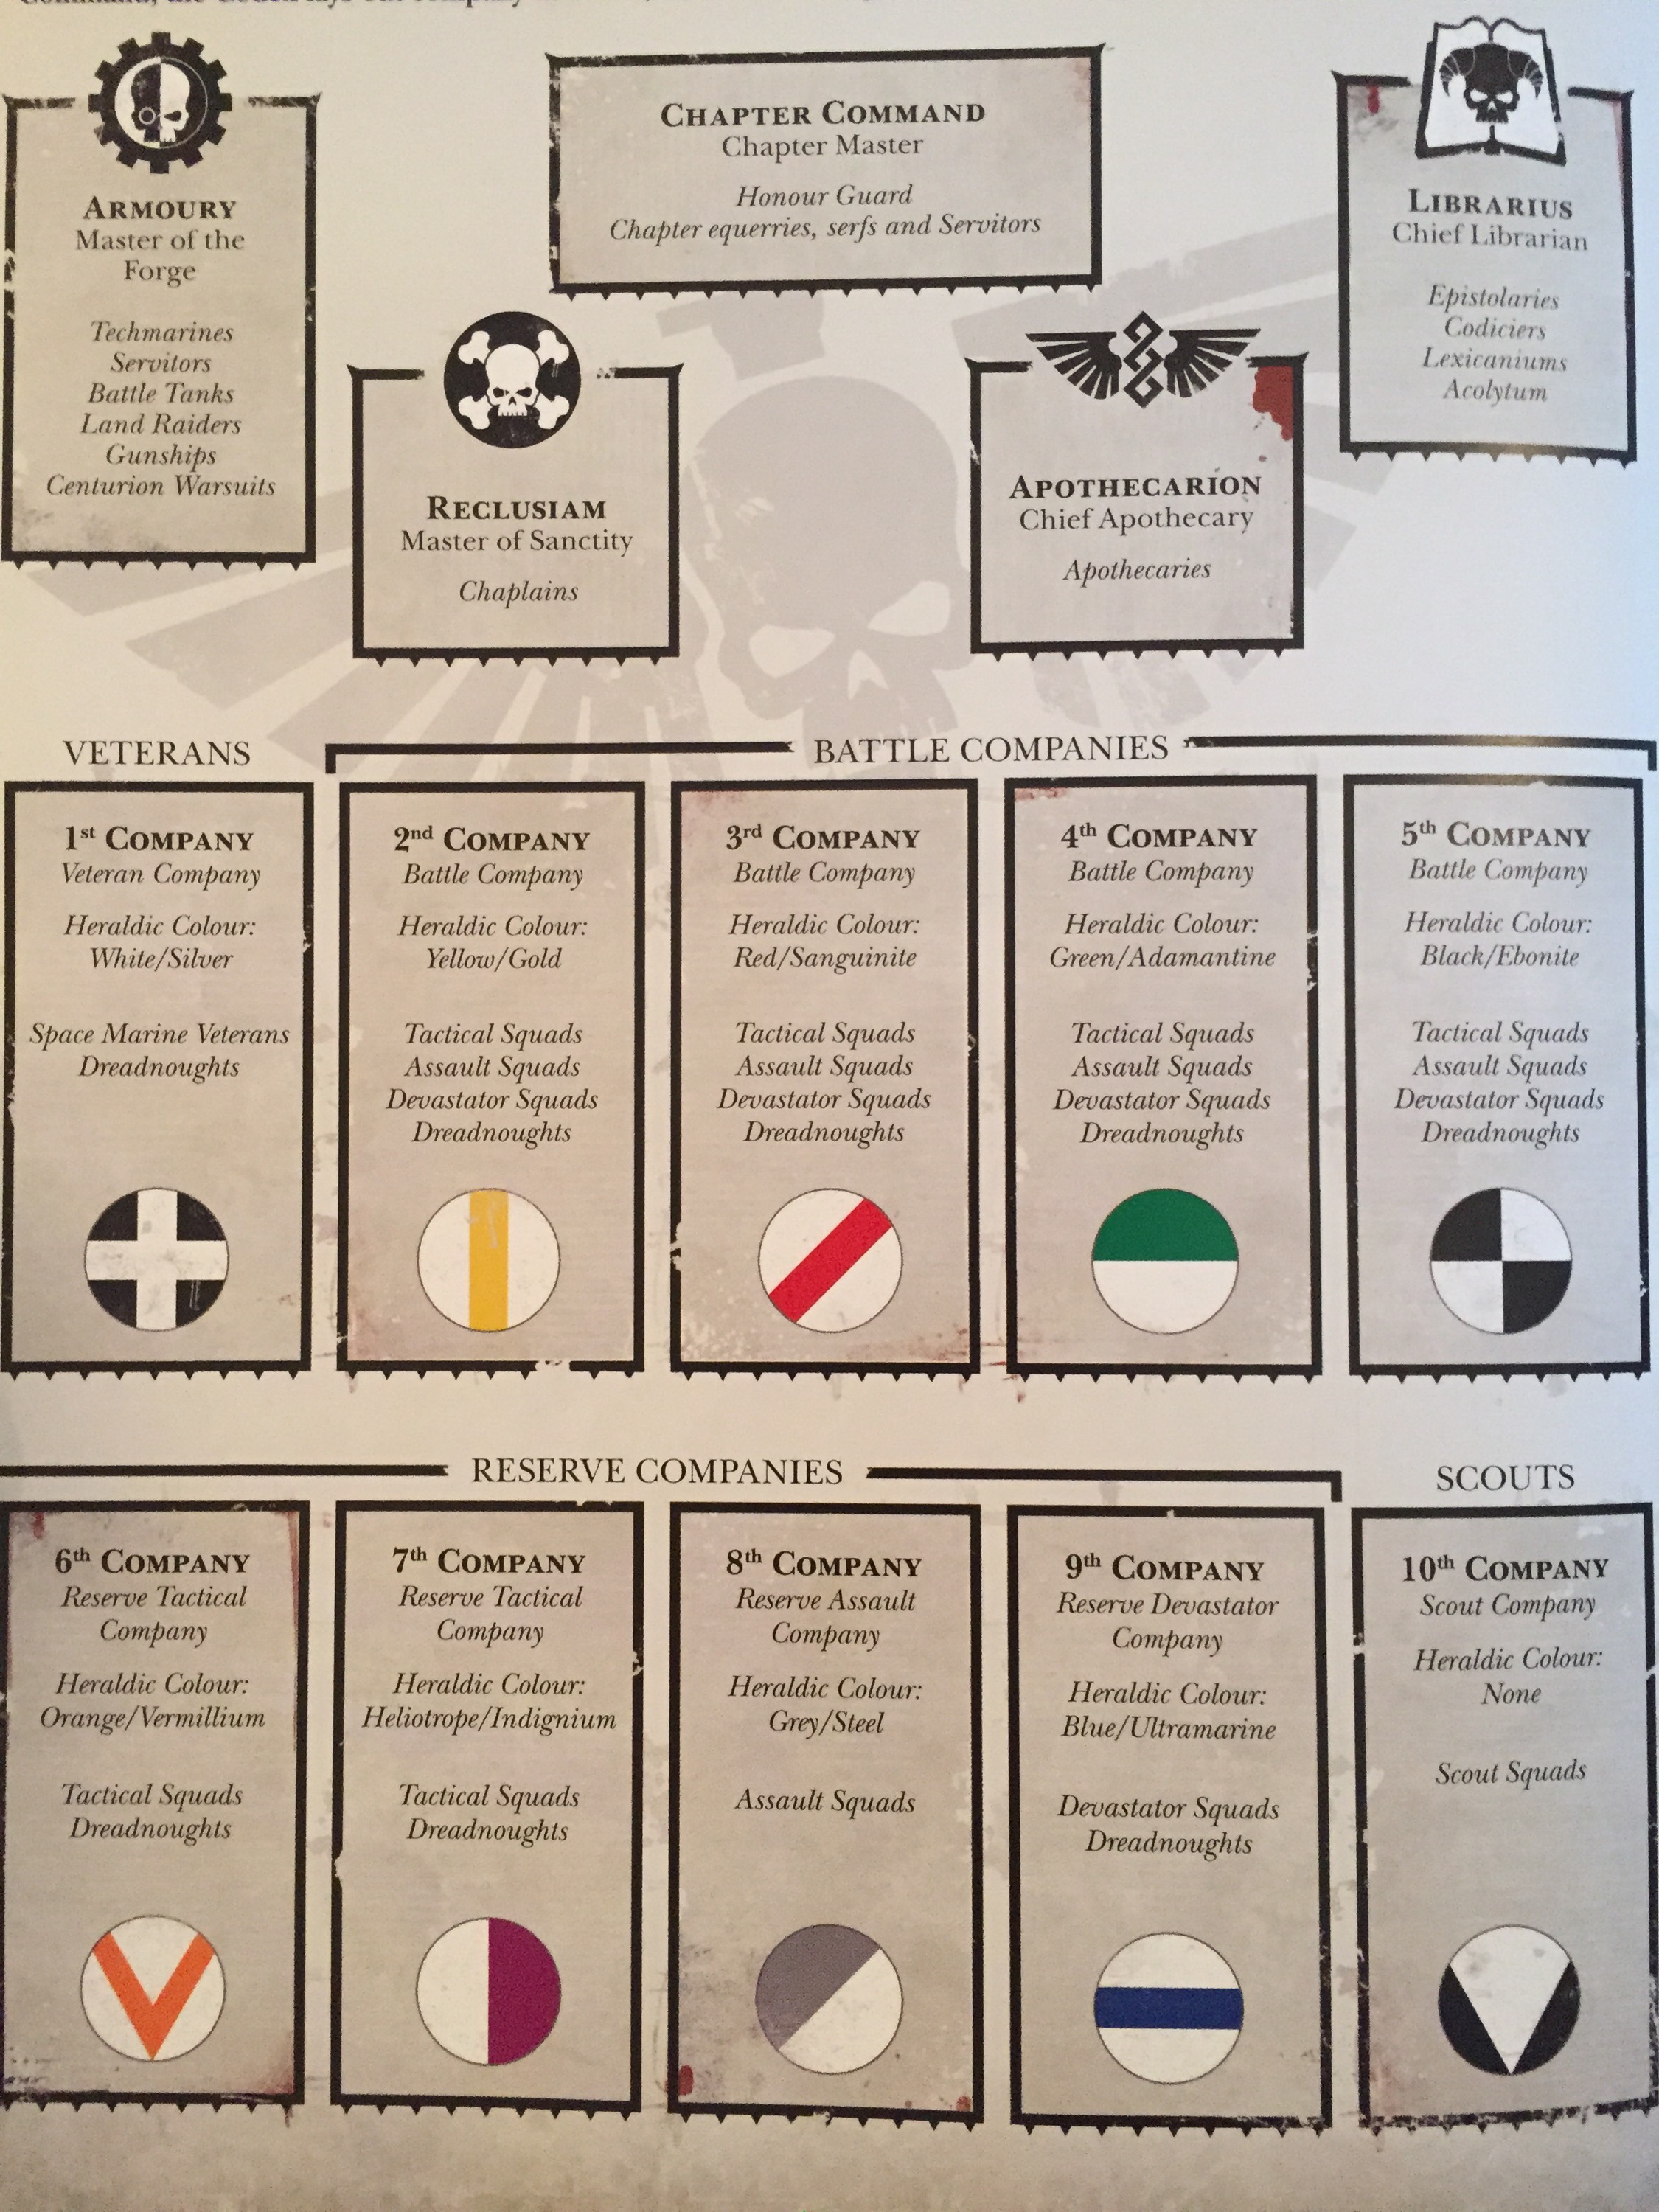
Firstly a review of how a Space Marine Chapter is formed post heresy. Every chapter is no greater than one thousand marines and split between ten companies, plus supporting divisions with their own heraldry, titles, symbols and history.
The first company is the elite soldiers and veterans of the chapter. The second to fifth are battle companies; the front line of the chapter. The sixth to ninth are the specialist reserve companies and the tenth are formed of scouts. Scout companies are posed of fresh recruits from the chapter home world who later go on to join other companies within the chapter.
The chapter also consists of an Armoury (tech marines, tanks and flyers), Reclusiam (chaplains), Apothecarion (Apothecaries), Librarius (Librarians), and Chapter Command.
The Iron Hands Chapter
Companies are referred to by the Iron Hands as Clans. Clans once represented the competing organisations on the Iron Hands home world of Medusa before the coming of the Great Crusade. Ferrus Manus, primarch of the Iron Hands, kept the formation of Clans in order to encourage their competitive nature historically formed when once fighting for scarce planetary resources.
Each Clan has its own history and character which marines emulate upon joining or being promoted (i.e going from a recruit of the 10th to a full battle-brother of the 3rd).
There is some contradiction around this as previous materials (codexes and novels) state that clans do their own recruitment. However the Clan Ruakaan Supplement differs. I personally think this makes sense given the first companies status as the veteran company.
This is how the Iron Hands Chapter looks under the codex composition:
I will be basing my army primarily around Clan Raukaan, but also drawing from Squads in the 1st, 6th, and the 10th companies. This works well for me because it means I don’t waste most of my Forge World transfers 😉 and I can also use known characters and units from more than one clan.

Known Squads of the Clan Ruakaan
Just as companies are known as Clans, so too are squads known as Clave’s.
I’ve listed them here by Clave number, name, unit type, and any known characteristics in brackets.

Other mentioned squads:
Unfortunately these squads have only been mentioned by number and not name, but I have put them in because their existence and unit type is known.
Clan and Squad Markings
Squad members marked with the icon of their chapter on the left shoulder pad, and their clan on their right. On their left knee pad is marked the number of their Clave and on the right shin is the unit type (tactical, assault, veteran etc.)
References:
++End Transmission++
Follow me and message me on Twitter @FerrumFrater
Hello,
We attended the Forge World Open Day in July but haven’t managed to get around to posting our photos up yet, so here they are! 🙂
A few interesting things… not least of which is the Mastadon and the Tau Titan!


Cheers,
Neil
Hi there,
I hope the last blog post was well received. As I am sure you are all aware last time we covered my new Marauder Horsemen, which were designed to be a slightly heavier looking type of cavalry unit. This week we will cover something a little different…..
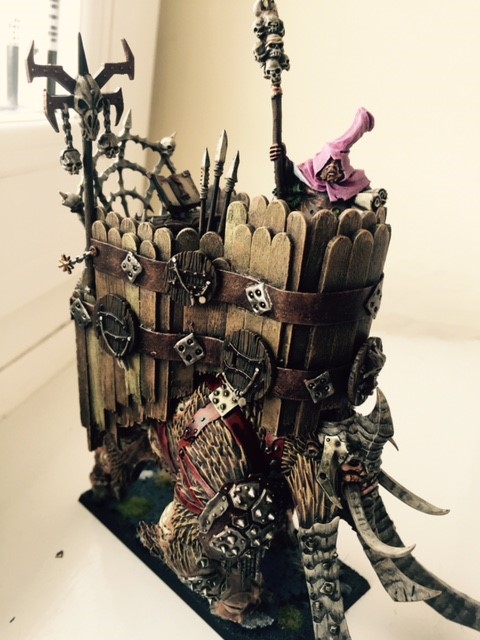
…A Chaos Warshrine conversion. As I waffled on a little last week, I’ll try not to this time. I will not attempt to refer to how I came to this idea. But it is in keeping with my armies Barbarian theme and I wanted a Chaos Shrine that was a little more monstrous and imposing on the battlefield. So I decided that I would mount my shrine on a Mammoth.
Once I had all the bits I set about construction of the Mammoth completing the whole assembly apart from the rider’s seat on the Mammoth’s back. I found this was helpful as it allowed me nearly full access to the inside of the Mammoth’s shell while having a nice solid base to work from. Next I processed to clean up the Mammoth making sure I removed all mould lines and filling all gaps with green stuff. This can be a little tricky but I found holding the model up to the light meant I could easily see small gaps, especially on the underside.
While I left this to set and dry, I started construction of the shrines basic floor plate, adding the sides, where needed for a little strength. (The sides were temporarily to proved a little perspective of size and fit). Once dry and holding together reasonably well, I started a little bit of concept work, which was basically plonking one down on top of the other as in the first picture.
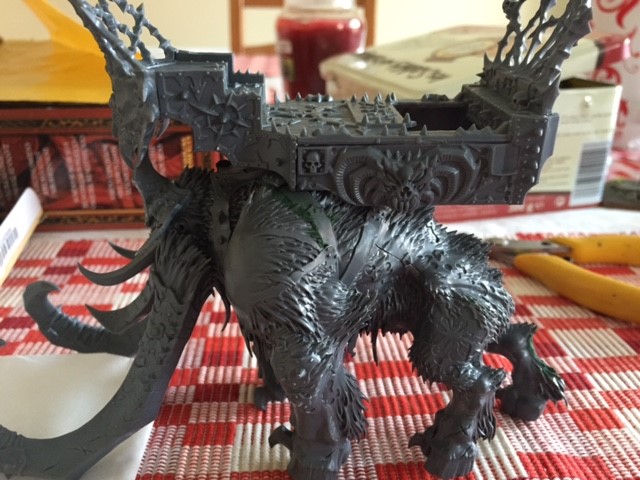
As you can see from the picture the Warshrine was a little too big for the Mammoths back, and it was also obvious to me at this point, I needed to do something to ‘bind’ the two together, as floating in mid air on his back wouldn’t look right. This is where my evil twin @CPJohnson, came in with another inspirational idea, a Howdah!
At this point any Howdah would need to be constructed out of an easy to manipulate material that was of varying sizes as the back of the mammoth is a lot further down than the front. Again @CPJohnson came up with another brilliant idea as if it was nothing, coffee sticks! (I am sure you see why I call him my evil twin, it’s down right depressing at times trust me). This construction material was perfect as it was small enough for me to manually manipulate it to fit the required size and already had the characteristics of wood. It was also free from any good retailer 🙂
Yes I did!
In practice though, the construction was not as easy as it might appear. First I clipped the back off the Shrine, losing the hole for the skull pit, which I wasn’t a fan of anyway. This made the shire fit better, then I removed my sides, as the sticks would make up the walls. Then balancing the shine roughly where I wanted it with Blu-Tack, I eyeballed the length required for my first stick, roughly in the middle on the side, I snapped it to the right length, this also gave a nice rough and ready look. I did this for about four or five sticks placing each one down on my cutting mat side by side. I then completed the process again for a second layer of sticks to sit on top of the first but slightly lower. This was essential for two main reasons: first it would provide the Howdah with a bit of strength; second it would allow me to cover and hide a few errors as I went around the outside of the shrine’s floor plate. Once happy with the positions this section was glued together with PVA glue and allowed to dry overnight. Picture two was taken after construction but provides direct reference to my points above.
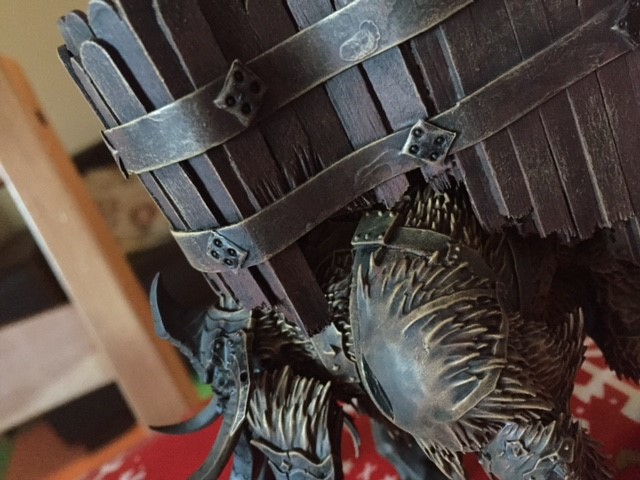
Gluing section by section to the Warshrine with superglue, slowly allowed me to build up the wall of my Howdah, this was delicate work as this only provides small contact surface between the wall and the floor plate. Once all the walls were complete I applied green stuff on the underside liberally to increase contact areas and add strength to the model. At this time I also attached the saddle/seats onto the Mammoth and used more green stuff to build them up to make small stands that would allow me to pin the two sections together. This is a bit trial and error, with a lot of marking and remarking but once I was happy with the placement I waited for the green stuff to set, and attached pins to the Mammoth and holes on the underside of the Howdah.
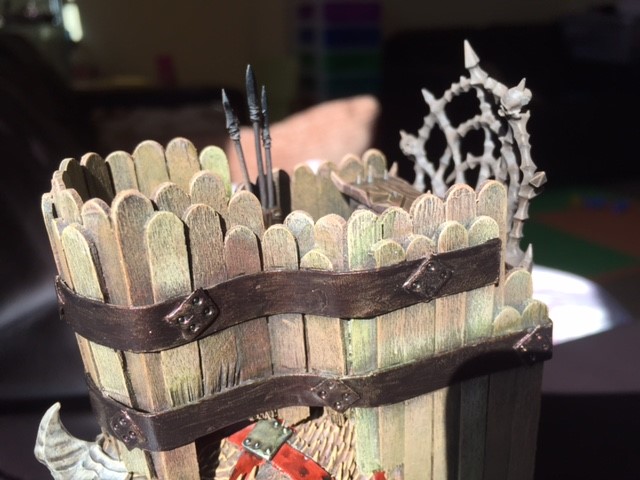
The next day the whole model was sprayed black and then dry brushed up using four browns. Vallejo paints Black Brown, Chocolate Brown, Ochre Brown and Yellow Ochre, mix these 50/50 and end up applying 8 or nine light coats this is very much base colours, as seen in picture two.
I next added a few ornaments and decorations, the chopping block fitted in the Howdah and one of the bone sides of the Warshrine fit nicely on the back of the wall to keep the Chaos feel. I added some cardboard, cut in strips, around the outside of the Howdah at 90 degrees to the coffee sticks, to provide the look of metal banding. Then I added some shields and green stuff moulded to look like nails. These were all painted with base colours as described above, before being glued in place, metal being painted with just a layer of Tin Bitz.
With the construction over apart from crew, I added base colours to areas not yet touched. Flat Flesh for the mammoth’s skin, and Rotting Flesh for wounds. Cavalry Brown for straps and leather and Kamo Karki for bone areas. My painting style is quite basic but I do tend to take my time on each stage, which I help improves my results, but my rule of thumb being: if it’s not simple to do, I won’t be doing it!
The next stage after base colours; for me is usually shades and washes, and this was no different. On the hair and fur I applied a liberal but heavily watered down Earthshade wash, about 10/90% water. I then added a small amount of a Dark Green Ink and then touched the Howdah in places where I would image water damage to the wood, i.e around joins etc. (Not forgetting to do shields and Leather) Then I used Nuln Oil to darken the metal and add shade to the skin, finally mixing Nuln Oil and Earthshade together to add shade to the Bone. These mixes were usually of a 50/50 split and then watered down by half again. I then went back and covered 50% or so of the model again, with the last base colour used, this simple technique I have found adds: shade; depth and then highlight to a basic level, this is what I usually call table top standard. No need for all the complaining about standards, just my opinion :).
I now began work on the highlighting which involved Bleached Bone on the bone areas; I painted in small lines in a continual direction in order to achieve the effect on the horns. Dwarf Flesh on the Mammoth’s skin. Dwarf Bronze and Bolt Gun Metal, on the metal areas and finally a mix of Blood Read and Cavalry Brown into open wounds and edge highlighting for the leather. At this stage I was ready to attach the model to the Warshrine base, which the Mammoth luckily just fits onto, using the same technique covered previously in posts.
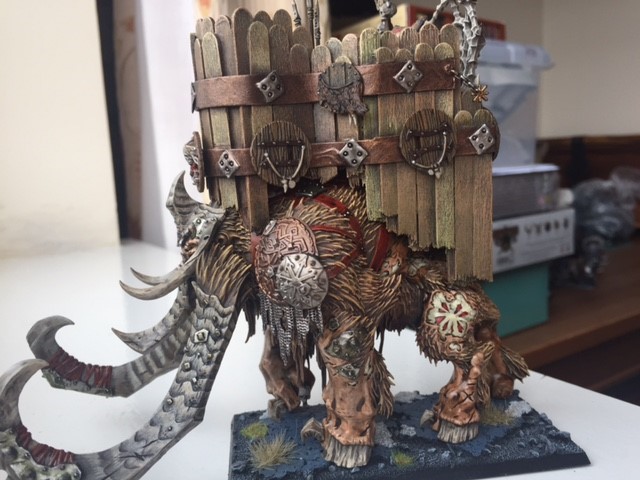
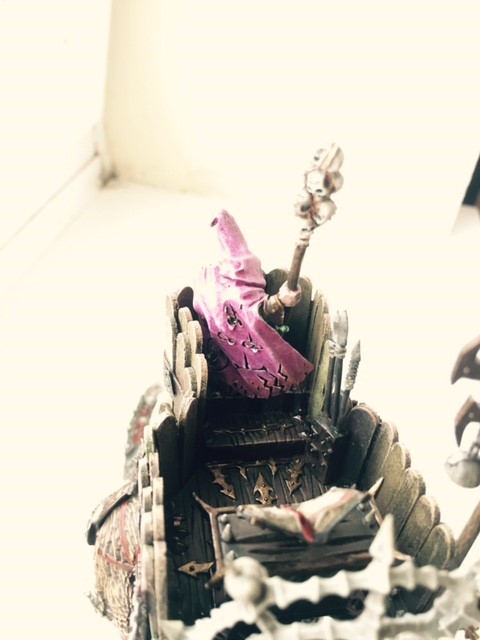
This left the finial part of the model the rider; I spent a few weeks thinking about what or who I wanted, but I came to the conclusion to add a model I have previously painted to keep with the feel for the army, it also happened to fit in for a tournament list I was toying with at the time. This model was a Wizard, which would take the Warshrine as a mount. It has actually been a while since I painted this Wizard, so I am not sure of the painting combinations I used at the time, but it mainly comprises of bone, browns, and pinks which fit my army perfectly.
I am really pleased with how the finished model has turned out, probably one of my best, which hopefully shows that you don’t have to be a great painter to produce something nice, and will inspire some of you out there to give something a go. My main advice is even if you have a concept idea, get you bits together and be prepared to let them change as you construct. If anyone has any questions or needs more information please feel free to leave me a comment and I will happily respond. 🙂
Cheers,
Greg
